How to use a Seclusion Session Report
A Seclusion Session Report1 must be manually started by a clinican. Below is a step-by-step guide on how to use a Seclusion Session Report.
1 Please note: The Seclusion product is a reporting tool intended to support management of seclusion sessions by recording rapid tranquilisation events alongside data from Oxehealth’s Vital Signs medical device and other non-medical device product, Activity Tracker. The Seclusion product does not have a medical purpose or functionality. The Seclusion product is not intended to be used as an independent medication record.
Step 1: To start a Seclusion Session Report select “Start Session Report” on the Seclusion Overview Screen when a new patient enters the room or you wish to start a new session

When the “Start Session Report” button has been selected, the button on the room tile will indicate the duration of time since the session was started2:

2 If you are using a handheld device and experience low/no wifi connectivity, the button may display the text “Failed to Start Session”. If this occurs, move into an area with stronger wifi connectivity and repeat Step 1 again.
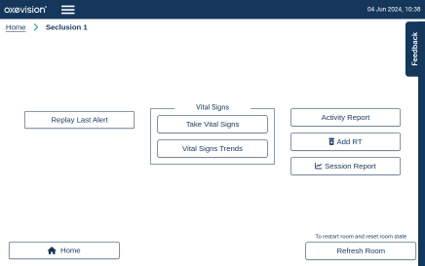
Step 2: A number of room actions are available for seclusion rooms with Seclusin Session Report enabled. To access the room actions, select the relevant seclusion room tile

3 Please note: The Room Actions menu may exclude, or include, other menu items than the ones shown above. If you have any questions, please contact Oxehealth’s Customer Success team at training@oxehealth.com.
A list of available room actions is provided below along with links to other relevant ‘how-to’ guides on OxeAcademy:
- Replay Last Alert
- Take Vital Signs
- Vital Signs History (guide pending)
- Vital Signs Trends
- Activity Report
- + Add RT (please refer to Step 4 in this guide)
- Session Report (please refer to Step 5 in this guide)
- Refresh Room.
Step 4: In cases where rapid tranquilisation (RT) is administered, you can select the “+Add RT” button on the Room Actions menu. This will open the Add RT page where you can select a date and time that RT was administered4

Selecting the “Save” button will record the instance of RT to be included in the respective Seclusion Session Report and Seclusion Summary Report.
4 Please note: RT events cannot be retrospectively entered prior to the start of a seclusion session and events cannot have a time set in the future.
Step 5: The Seclusion Session Report can be viewed while a session is in progress by selecting “Session Report” on the Room Actions menu
The Seclusion Session Report displays a record of the patient’s Vital Signs observations and trends, RT administration times, and patient activity during each seclusion session
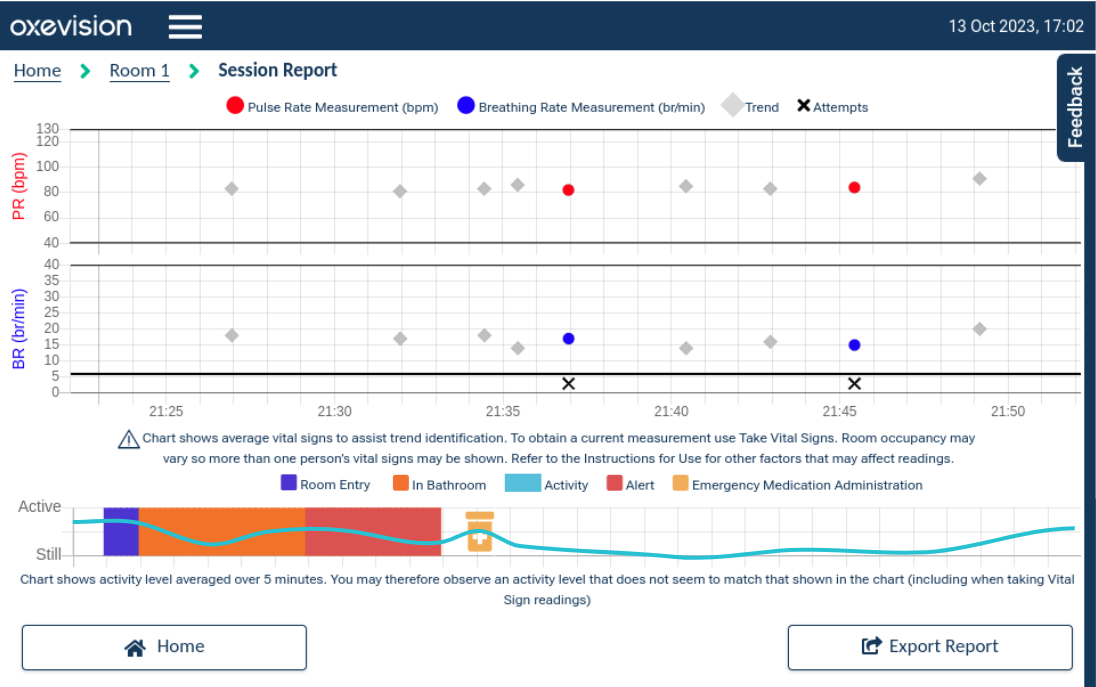
The patient’s vital signs are displayed on both the Pulse Rate (PR) and Breathing Rate (BR) chart with corresponding times.
- Any successful attempts are shown with a red dot for pulse rate and a blue dot for breathing rate
- All Vital Signs attempts (successful or unsuccessful) are shown with a cross indicating the times they were attempted
- Vital Signs Trends are shown with grey diamonds. These indicate the average of automatic vital signs measurements made by the software without the user making spot-check observations using “Take Vital Signs”.
The blue line indicates the overall activity level of the individual. If available, “In Bathroom” periods, “Door Open” periods, “Alert” and “Rapid Tranquilisation” times will also be displayed on the Activity Chart of the Seclusion Session Report.
If you need to scroll across the Seclusion Session Report timeline, you can do so by scrolling left to right on the activity portion at the bottom of the report.
Step 6: When the patient has left the room or you wish to end the session, simply select the red button that indicates the duration of the session below the relevant seclusion room tile

IMPORTANT: A Seclusion Summary Report is retained for 7 days after a seclusion session has ended and provides a text summary of the recorded details in a Seclusion Session Report including:
- Room states
- RT summary and timings
- Vital signs information including attempts, trend rates, and completed vital signs.

To find out how to view or export a Seclusion Summary Report, please view the ‘How to view and export a Seclusion Summary Report’ module.
An electronic copy of the Instructions for Use and device labelling are available on the screen. These detail how to use and care for the system. This "how to" guide does not replace the Instructions for Use; if you are unsure of anything, please re-read the Instructions for Use or ask your Oxehealth Ward Lead or OxeChampions.
To access the Instructions for Use, click on “Instructions for Use” on the screen.
You must be trained to use the system. Your Oxehealth Ward Lead can arrange this for you – or ask your manager.
Up next

